How to Create a React WordPress Theme in 30 Minutes
- Post AuthorBy Reyes Martínez
- Post DateThu Feb 27 2020
If you’re new to Frontity, we recommend you check this step-by-step tutorial, a learning resource designed to guide you through the creation of a Frontity project from start to finish.
In October 2019, David and Luis from the Frontity team hosted a workshop in Spanish on How to Create a React WordPress Theme in Less than 30 Minutes at WordCamp Sevilla, the first WordCamp for Developers in Spain.
The first part of the workshop was a short introduction to our previous work with WordPress publishers and how we built the internal React framework that turned into what Frontity is today.
The second part was a practical guide on how to build a React theme for your WordPress site. Luis and David published the code and the steps they followed during the workshop on this GitHub repo (in Spanish). In addition, the session can be watched on WordPress TV and YouTube.
Below, you will find a translated version of the guide they shared so it can be accessible to more Frontity users. Please note that some explanations and context they gave during the workshop might be missing.
Table of contents:
- Create a Frontity project
- Create a custom theme from scratch
- Modify the first component
- Connect it to the state
- Add a menu
- Use data from the current URL
- Display the list of posts
- Display the content of posts
- Add some style
- Use
stateandactions - Add tags to the
<head>
Prerequisites
- NodeJS installed in your computer.
- A local install of WordPress, you can use Local by Flywheel.
How to Create a React Theme
1. Create a Frontity project
Let’s start by creating a new Frontity project. To do so, open up your terminal and run this command:
npx frontity create wc-sevillaWhen the install process finishes, you’ll have a new folder called /wc-sevilla with your project’s code.
Start a development server to see that it is working:
cd wc-sevilla
npx frontity dev
Now open http://localhost:3000 in your browser (if not already opened) to see and interact with your first Frontity project in a development environment (on your computer).
Your new project comes by default with a starter theme called @frontity/mars-theme, which is connected to a WordPress test site (https://test.frontity.io).
The next step is to change the project’s settings to point to the REST API of WCSevilla’s website (https://2019-developers.sevilla.wordcamp.org/):
1. Open the frontity.settings.js file. This file contains the configuration of the Frontity packages which you are using in the project.
2. Change the configuration of the "url" field of the @frontity/wp-source package.
Replace this:
state: {
  source: {
    url: "https://test.frontity.io"
  }
}
With this:
state: {
  source: {
    url: "https://2019-developers.sevilla.wordcamp.org"
  }
}
3. Refresh http://localhost:3000 in your browser to see all the posts of WCSevilla’s website.
👉 In this guide, we created the wc-sevilla project and used the official website of WordCamp Seville as our WordPress installation. Remember to replace both with the name of your project and your WordPress URL.
2. Create a custom theme from scratch
Instead of using the default starter theme (@frontity/mars-theme), create a new package for the code of your custom theme.
To do so, stop the previous process (CONTROL + C), and then run this in your terminal:
npx frontity create-package wc-sevilla-themeYou will be asked what namespace to use. Since you are creating a theme, you can use theme.
💡 You can learn more about the use of namespaces in Frontity here.
When the process is complete, you’ll find a new folder called /packages/wc-sevilla-theme where you can start working.
The first thing you have to do is to remove @frontity/mars-theme from your settings and replace it with wc-sevilla-theme.
Remove @frontity/mars-theme from your settings:
{
  name: "@frontity/mars-theme",
  state: {
    theme: {
      menu: [
        ["Home", "/"],
        ["Nature", "/category/nature/"],
        ["Travel", "/category/travel/"],
        ["Japan", "/tag/japan/"],
        ["About Us", "/about-us/"]
      ],
      featured: {
        showOnList: false,
        showOnPost: false
      }
    }
  }
},
Replace it with:
{
  "name": "wc-sevilla-theme"
},
And lastly, run this command again:
npx frontity dev3. Modify the first component
Modify the <Root> component in the /packages/wc-sevilla-theme/src/index.js file so that it returns a <h1> with “WordCamp Sevilla 💃🏻”.
const Root = () => {
  return (
    <>
      <h1>WordCamp Sevilla 💃🏻</h1>
    </>
  );
};
Now, move the <Root> component to its own Root.js file.
// File: /packages/wc-sevilla-theme/src/Root.js

import React from "react";

const Root = () => {
  return (
    <>
      <h1>WordCamp Sevilla 💃🏻</h1>
    </>
  );
};

export default Root;
And finally, import it from index.js.
// File: /packages/wc-sevilla-theme/src/index.js

import Root from "./Root";

export default {
  name: "wc-sevilla-theme",
  roots: {
    theme: Root
  },
  state: {
    theme: {}
  },
  actions: {
    theme: {}
  }
};
4. Connect it to the state
Let’s connect the <Root> component to the Frontity state using connect.
Next, show the URL you are in using state.router.link.
// File: /packages/wc-sevilla-theme/src/Root.js

import React from "react";
import { connect } from "frontity";

const Root = ({ state }) => {
  return (
    <>
      <h1>WordCamp Sevilla 💃🏻</h1>
      <p>Estamos en {state.router.link}</p>
    </>
  );
};

export default connect(Root);
You can try with a URL like http://localhost:3000/hola-sevilla and see how state.router.link changes.
5. Add a menu
Create a <Link> component in a new Link.js file:
// File: /packages/wc-sevilla-theme/src/Link.js

import React from "react";
import { connect } from "frontity";

const Link = ({ href, actions, children }) => {
  return (
    <div>
      <a
        href={href}
        onClick={event => {
          event.preventDefault();
          actions.router.set(href);
        }}
      >
        {children}
      </a>
    </div>
  );
};

export default connect(Link);
Within <Root>, you will now have to import the Link component and add a menu with two routes: “Inicio” and “Preguntas frecuentes” (“Homepage” and “Frequent questions” respectively).
// File: /packages/wc-sevilla-theme/src/Root.js

import Link from "./Link";

const Root = ({ state }) => {
  return (
    <>
      <h1>WordCamp Sevilla 💃🏻</h1>
      <p>Estamos en {state.router.link}</p>
      <nav>
        <Link href="/">Inicio</Link>
        <Link href="/page/2">Inicio - página 2</Link>
        <Link href="/informacion/faq/">Preguntas Frecuentes</Link>
      </nav>
    </>
  );
};
6. Use data from the current URL
To have a better understanding of Frontity, let’s go a little further and investigate how it works below the surface.
To do so, access http://localhost:3000/informacion/faq/ in the browser and open the console. Then, use frontity.state to see the Frontity state. This is the same state that the components and actions then access.

👉 Frontity uses ES2015 Proxies, so you have to open the property [[Target]] to see the state.
There you’ll find the global state about frontity, with general properties of your Frontity project; information about the router, including the state.router.link that you already used; and source, the package that connects to your WordPress site.
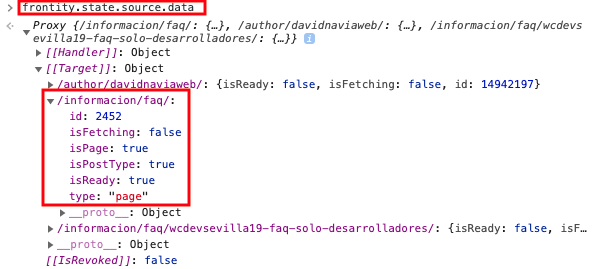
Let’s take look at state.source.data, where the information of each URL is stored. If you inspect /information/faq, you can see that it’s a page, and that it has the ID 2452.
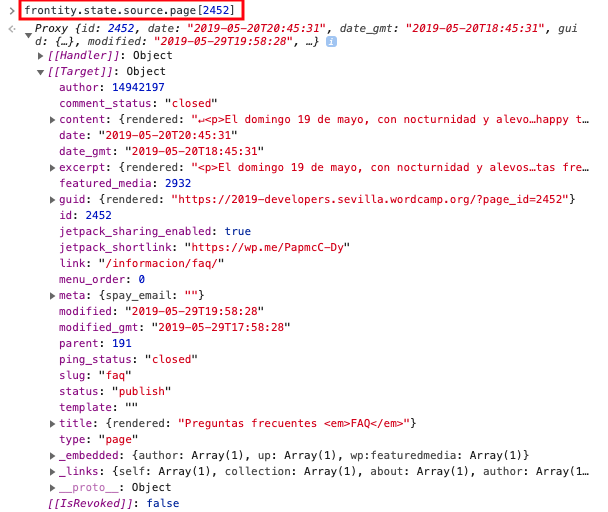
With that information, you can access the data (title, content, etc) of that page using state.source.page[2452]:
As you navigate from one URL to another, the @frontity/wp-source package downloads everything you need automatically and stores it in state.source.
Now, if you open the Network tab (in the browser) and click on the menu to go to Inicio (Homepage), you will see that a call to the REST API is made to get the latest posts.
Take a look at frontity.state.source.data, there’s a lot of populated data.
Instead of state.source.data [url], it’s better if you use state.source.get (url). This ensures that URLs always include the final slash (/).
Let’s inspect the homepage using state.source.get ("/"):
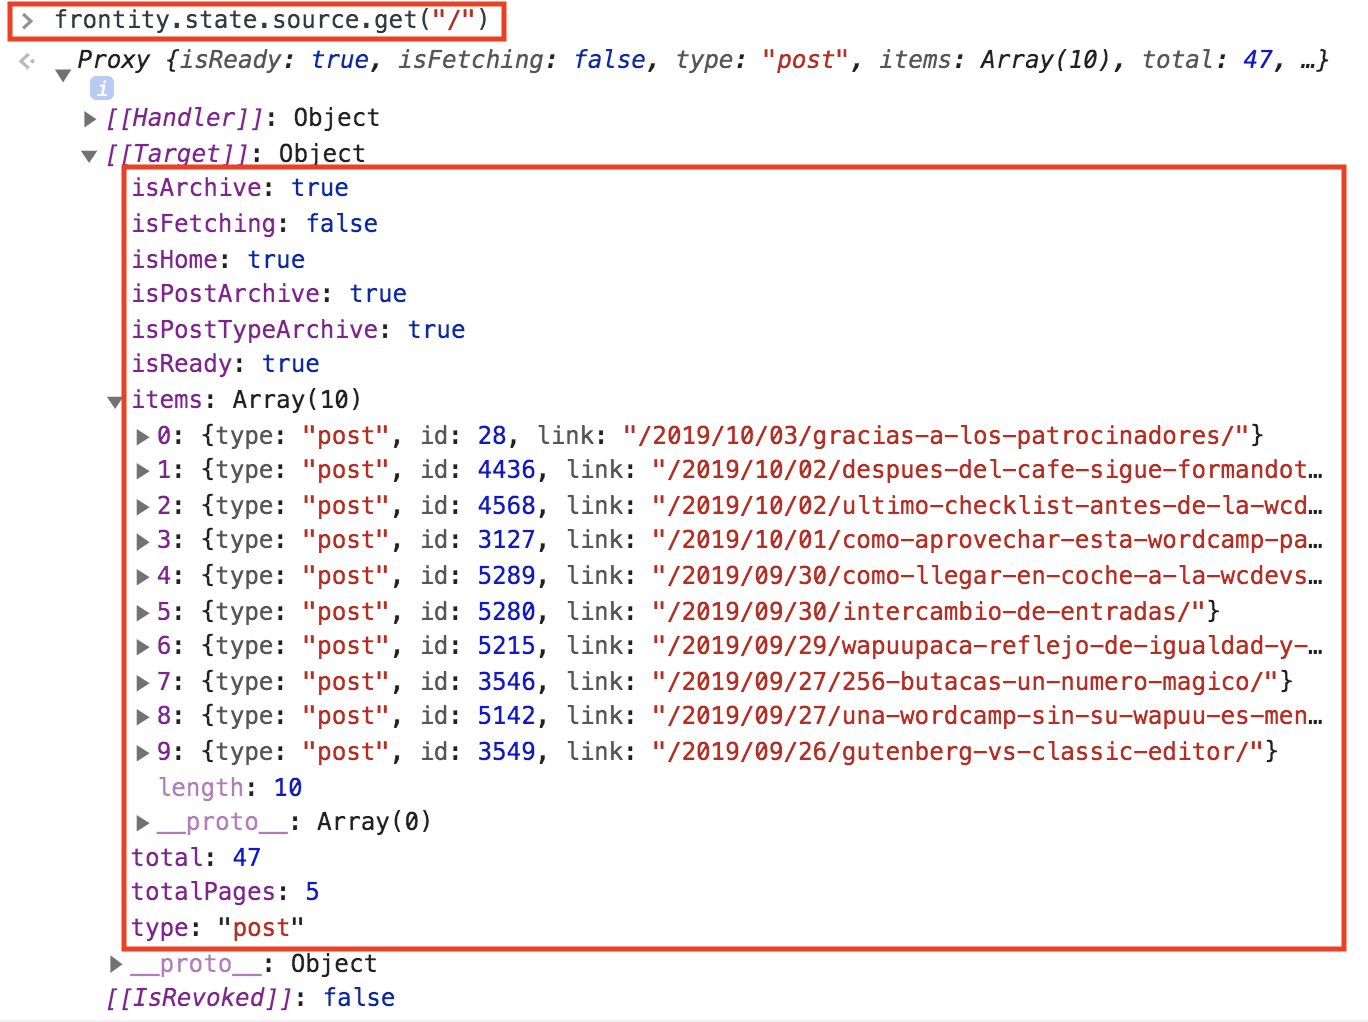
As you can see, it has many interesting properties such as isHome, isArchive, and an array of items. If the homepage were a category, it would have a isCategory property. If it were a post, it would have a isPost, etc.
Finally, you’re going to use all of this in your code.
The next step would be to obtain the information of the current link (state.router.link) and use it to see if it’s a list, a post, or a page.
// File: /packages/wc-sevilla-theme/src/Root.js

const Root = ({ state }) => {
  const data = state.source.get(state.router.link);

  return (
    <>
      <h1>WordCamp Sevilla 💃🏻</h1>
      <p>Estamos en {state.router.link}</p>
      <nav>
        <Link href="/">Inicio</Link>
        <Link href="/page/2">Inicio - página 2</Link>
        <Link href="/informacion/faq/">Preguntas Frecuentes</Link>
      </nav>
      <hr />
      <main>
        {data.isArchive && <div>Es una lista</div>}
        {data.isPost && <div>Es un post</div>}
        {data.isPage && <div>Es una página</div>}
      </main>
    </>
  );
};
7. Display the list of posts
In order to display the list of posts, make a component called <List> which shows the information in state.source.data: the type, id and link of each post.
// File: /packages/wc-sevilla-theme/src/List.js

import React from "react";
import { connect } from "frontity";

const List = ({ state }) => {
  const data = state.source.get(state.router.link);

  return (
    <div>
      {data.items.map(item => {
        return (
          <div key={item.id}>
            {item.type} – {item.id} – {item.link}
          </div>
        );
      })}
    </div>
  );
};

export default connect(List);
And import it within Root.js:
// File: /packages/wc-sevilla-theme/src/Root.js

// ...
import List from "./List";

const Root = ({ state }) => {
  const data = state.source.get(state.router.link);

  return (
    <>
      {/* ... */}
      <main>
        {data.isArchive && <List />}
        {data.isPost && <div>Es un post</div>}
        {data.isPage && <div>Es una página</div>}
      </main>
    </>
  );
};
From the <List> component now, access the information of each of the posts to show the title and turn it into a link.
// File: /packages/wc-sevilla-theme/src/List.js

import React from "react";
import { connect } from "frontity";
import Link from "./Link";

const List = ({ state }) => {
  const data = state.source.get(state.router.link);

  return (
    <div>
      {data.items.map(({ id }) => {
        const post = state.source.post[id];
        return (
          <Link key={id} href={post.link}>
            {post.title.rendered}
          </Link>
        );
      })}
    </div>
  );
};
8. Display the content of posts
Create a <Post> component to display the title and the content.
// File: /packages/wc-sevilla-theme/src/Post.js

import React from "react";
import { connect } from "frontity";

const Post = ({ state }) => {
  const data = state.source.get(state.router.link);
  const post = state.source[data.type][data.id];

  return (
    <div>
      <h2>{post.title.rendered}</h2>
      <div dangerouslySetInnerHTML={{ __html: post.content.rendered }} />
    </div>
  );
};

export default connect(Post);
Then, import it within Root.js and use it for posts and pages.
// File: /packages/wc-sevilla-theme/src/Root.js

// ...
import Post from "./Post";

const Root = ({ state }) => {
  const data = state.source.get(state.router.link);

  return (
    <>
      {/* ... */}
      <main>
        {data.isArchive && <List />}
        {data.isPost && <Post />}
        {data.isPage && <Post />}
      </main>
    </>
  );
};
9. Add some style
It’s time to show you how to add some basic style to your theme so that at least your page elements look better positioned.
💡 You can learn more about how to style your Frontity app here.
The first thing you can do is to create global styles and change the font to be sans-serif instead. To do so, import the <Global> component and the css function of Frontity in Root.js.
// File: /packages/wc-sevilla-theme/src/Root.js

// ...
import { connect, Global, css } from "frontity";

const Root = ({ state }) => {
  const data = state.source.get(state.router.link);

  return (
    <>
      <Global
        styles={css`
          html {
            font-family: sans-serif;
          }
        `}
      />
      {/* ... */}
    </>
  );
};
The font must have changed automatically on your website.
Now, create some CSS components. These components are created using styled followed by the HTML tag that you want to use, and then a template string with the CSS code.
Let’s see an example by creating two <Header> components, <Menu> and <Body>, using styled.
In the Root.js file: import styled and create the previous components.
// File: /packages/wc-sevilla-theme/src/Root.js

// ...
import { connect, Global, css, styled } from "frontity";
// ...

const Header = styled.header`
  display: flex;
  flex-direction: column;
  align-items: center;

  h1 {
    font-size: 3em;
    text-align: center;
  }
`;

const Menu = styled.nav`
  display: flex;
  flex-direction: row;
  flex-wrap: wrap;
  justify-content: center;

  & > div {
    margin: 16px;
  }
`;

const Main = styled.main`
  max-width: 800px;
  margin: auto;
  padding: 16px;

  img {
    max-width: 100%;
  }
`;
Once created, you will use them within <Root>:
// File: /packages/wc-sevilla-theme/src/Root.js

// ...

const Root = ({ state, actions }) => {
  const data = state.source.get(state.router.link);

  return (
    <>
      <Global
        styles={css`
          html {
            font-family: sans-serif;
          }
        `}
      />
      <Header>
        <h1>WordCamp Sevilla 💃🏻</h1>
        <p>Estamos en {state.router.link}</p>
        <Menu>
          <Link href="/">Inicio</Link>
          <Link href="/page/2">Inicio - página 2</Link>
          <Link href="/informacion/faq">Preguntas frecuentes</Link>
        </Menu>
      </Header>
      <hr />
      <Main>
        {data.isArchive && <List />}
        {data.isPost && <Post />}
        {data.isPage && <Post />}
      </Main>
    </>
  );
};
The elements of your page’s header, such as the title and menu, will now look a bit better positioned, just like the content of your pages.
And you can do the same with the <List> component.
Go to the List.js file, add the <Items> component, and use it within <List>:
// File: /packages/wc-sevilla-theme/src/List.js

const Items = styled.div`
  & > div {
    margin: 16px 0;
    font-size: 1.2em;
  }
`;

const List = ({ state }) => {
  const data = state.source.get(state.router.link);

  return (
    <Items>
      {data.items.map(item => {
        const post = state.source.post[item.id];
        return (
          <Link href={post.link} key={post.id}>
            {post.title.rendered}
          </Link>
        );
      })}
    </Items>
  );
};
Now, in the Link component, you can give some color to your links:
// File: /packages/wc-sevilla-theme/src/Link.js

import React from "react";
import { connect, styled } from "frontity";

const Anchor = styled.a`
  color: steelblue;
`;

const Link = ({ href, actions, children }) => {
  return (
    <div>
      <Anchor
        href={href}
        onClick={event => {
          event.preventDefault();
          actions.router.set(href);
          actions.theme.closeMenu();
        }}
      >
        {children}
      </Anchor>
    </div>
  );
};

export default connect(Link);
And finally, let’s add some dynamic style so you can see how to modify the styles depending on the state. For example, how to make the background color of the <Header> change depending on the page you are visiting,
In order to do this, you can add a function within the <Header>template string, where you will be able to use the props that you pass to that component. In this case, it will receive the boolean property isPostType, and display a blue color if it’s true, or green if it’s false.
// File: /packages/wc-sevilla-theme/src/Root.js

// ...

const Header = styled.div`
  display: flex;
  flex-direction: column;
  align-items: center;
  ${props =>
    props.isPostType
      ? "background-color: aliceblue"
      : "background-color: mintcream"};

  h1 {
    font-size: 3em;
    text-align: center;
  }
`;
When the function is added, you can pass the isPostType prop to <Header>.
// File: /packages/wc-sevilla-theme/src/Root.js

// ...

const Root = ({ state, actions }) => {
  const data = state.source.get(state.router.link);

  return (
    <>
      {/* ... */}
      <Header isPostType={data.isPostType}>
        <h1>WordCamp Sevilla 💃🏻</h1>
        <p>Estamos en {state.router.link}</p>
        <Menu>
          <Link href="/">Inicio</Link>
          <Link href="/page/2">Inicio - página 2</Link>
          <Link href="/informacion/faq">Preguntas frecuentes</Link>
        </Menu>
      </Header>
      {/* ... */}
    </>
  );
};
Our website will look a little more beautiful now!
10. Use state and actions
Finally, let’s learn how you can add your own state and actions.
Go back to the index.js file and add a new field called isMenuOpen in state.theme. Leave it as false by default.
// File: /packages/wc-sevilla-theme/src/index.js

export default {
  name: "wc-sevilla-theme",
  roots: {
    theme: Root
  },
  state: {
    theme: {
      isMenuOpen: false // add this field
    }
  },
  actions: {
    theme: {}
  }
};
Now, add two actions to modify this field. One of them will be to open the menu, and the other one to close it.
// File: /packages/wc-sevilla-theme/src/index.js

export default {
  name: "wc-sevilla-theme",
  roots: {
    theme: Root
  },
  state: {
    theme: {
      isMenuOpen: false
    }
  },
  actions: {
    theme: {
      // add these actions:
      openMenu: ({ state }) => {
        state.theme.isMenuOpen = true;
      },
      closeMenu: ({ state }) => {
        state.theme.isMenuOpen = false;
      }
    }
  }
};
And lastly, go to your Root.js file and change your <Root> component so that the menu is only displayed when open.
Replace this:
// File: /packages/wc-sevilla-theme/src/Root.js

// ...

const Root = ({ state, actions }) => {
  const data = state.source.get(state.router.link);

  return (
    <>
      {/* ... */}
      <Menu>
        <Link href="/">Inicio</Link>
        <Link href="/page/2">Inicio - página 2</Link>
        <Link href="/informacion/faq">Preguntas frecuentes</Link>
      </Menu>
      {/* ... */}
    </>
  );
};
With this:
// File: /packages/wc-sevilla-theme/src/Root.js

// ...

const Root = ({ state, actions }) => {
  const data = state.source.get(state.router.link);

  return (
    <>
      {/* ... */}
      {state.theme.isMenuOpen ? (
        <>
          <Menu>
            <Link href="/">Inicio</Link>
            <Link href="/page/2">Inicio - página 2</Link>
            <Link href="/informacion/faq">Preguntas frecuentes</Link>
          </Menu>
        </>
      ) : null}
      {/* ... */}
    </>
  );
};
Your menu will have disappeared with this but don’t worry, you still have to add two buttons.
The first one is in charge of displaying the menu when you click on it. This is as simple as adding a <button> element and passing it the openMenu action in the onClick prop.
// File: /packages/wc-sevilla-theme/src/Root.js

// ...

{
  state.theme.isMenuOpen ? (
    <>
      <Menu>
        <Link href="/">Inicio</Link>
        <Link href="/page/2">Inicio - página 2</Link>
        <Link href="/informacion/faq">Preguntas frecuentes</Link>
      </Menu>
    </>
  ) : (
    <button onClick={actions.theme.openMenu}>Menu</button>
  );
}
And now that the menu stays open, you have to add a second button to close it.
// File: /packages/wc-sevilla-theme/src/Root.js

// ...

{
  state.theme.isMenuOpen ? (
    <>
      <button onClick={actions.theme.closeMenu}>Close</button>
      <Menu>
        <Link href="/">Inicio</Link>
        <Link href="/page/2">Inicio - página 2</Link>
        <Link href="/informacion/faq">Preguntas frecuentes</Link>
      </Menu>
    </>
  ) : (
    <button onClick={actions.theme.openMenu}>Menu</button>
  );
}
Finally, you can style your menu button in the same way you did before (using styled).
// File: /packages/wc-sevilla-theme/src/Root.js

// ...

const Button = styled.button`
  width: 92px;
  margin: 16px;
  padding: 8px 16px;
  border-radius: 8px;
  background: white;
  color: black;
  font-weight: bold;
`;
It only remains to replace the <button> elements with the <Button> component and you would be all set.
// File: /packages/wc-sevilla-theme/src/Root.js

// ...

{
  state.theme.isMenuOpen ? (
    <>
      <Button onClick={actions.theme.closeMenu}>Close</Button>
      <Menu>
        <Link href="/">Inicio</Link>
        <Link href="/page/2">Inicio - página 2</Link>
        <Link href="/informacion/faq">Preguntas frecuentes</Link>
      </Menu>
    </>
  ) : (
    <Button onClick={actions.theme.openMenu}>Menu</Button>
  );
}
11. Add <head> tags
In order to add tags to the <head> of your page you can use React too. Simply import the <Head> component, and everything you include within will end up there.
// File: /packages/wc-sevilla-theme/src/Root.js
import { ..., Head } from "frontity";

// ...

const Root = ({ state, actions }) => {
  const data = state.source.get(state.router.link);

  return (
    <>
      <Head>
        <title>WordCamp Sevilla 2019</title>
        <meta name="description" content="El tema de React de la primera WC para devs!" />
      </Head>
      {/* ... */}
  );
};
Since it’s a React component, you can include it wherever you prefer. There’s no need to be in <Root>. In addition, you can use variables so that the tags change dynamically, just like you do in any other React component.
Other useful links
Do you want to know more about Frontity? Are you interested in learning more about React? Here you have some links where you can find further information:
- React guide: a guide to review the basics of React.
- Frontity Docs: the documentation of Frontity framework.
- Frontity’s step-by-step tutorial: a progressive sequence of lessons that takes you from the absolute basics to a solid understanding of Frontity, how it works, and how to develop themes and other functionality with Frontity.
- Frontity Talks: a series of videos created with the goal of explaining different topics about Frontity.
- Frontity Examples repo: each project in the repository is intended to demonstrate how to achieve a particular task using Frontity.
- Community Forum: this is the best place to get help on your project, share your learnings, show off what you have made with Frontity, and build new connections.
- Post TagsReact Theme, Tutorial, WordCamp Sevilla, WordPress